
Today I would like to share a tip that I found this summer when I had to migrate all my sites and those of my clients to Google Analytics 4 .
The idea is simple: It is a jQuery function (Javascript) which sends an event to Analytics if the determined class has been clicked .
The benefit : Being able to track any clickable element on our site to analyze its performance and make the necessary improvements to the site or our campaign . Or simply develop more precise reports and statistics for yourself or your client.
Here I will take as an example the tracking of clicks on the play button of the audios of my storybook site: talesdefees.com
Steps:
- Determine the CSS class of our clickable element
- Insert the script in the page or in the site header or in Google Tag Manager
- Check that the event is sent and received
- Convert you to conversion Analytics and Google Ads
Determine the unique CSS class of our clickable element
Open the page and inspect the element to be tracked by right clicking > inspect on it:
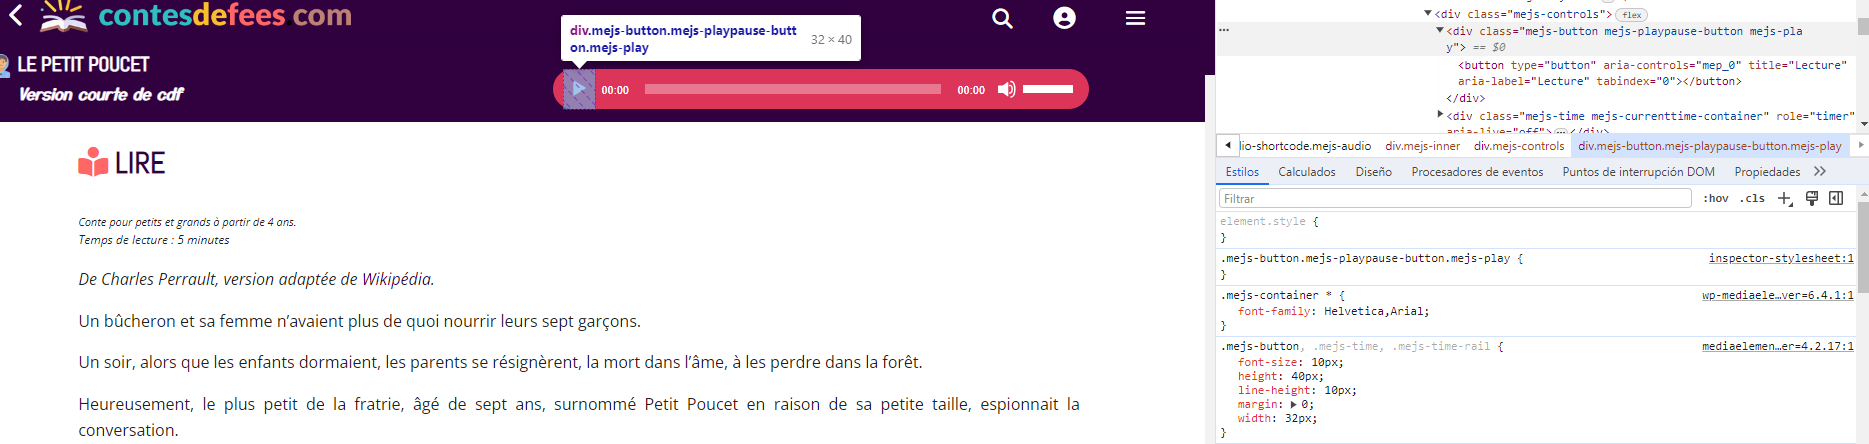
The element must have a unique CSS class that I can isolate by clicking the “+” symbol in the CSS simulator at the bottom right for example. Here I get the compilation of all the classes in the div: .mejs-button.mejs-playpause-button.mejs-play .
I check that this set of classes will only concern the play button of my audio player and that my event will only be activated on each click to listen to a story and not on another div .
If you have access to the code, you can create your own unique CSS class on the element to make sure the event is unique.
This will allow me, for example, to measure the percentage of visitors to the story who wish to listen to the audio version and to draw conclusions about the value of the audio compared to the text.
Insert the script into the site or into Google Tag Manager
Now that you have identified the unique CSS class, you need to insert the jQuery script into your site code if you have access to it. Marketers who want to save themselves the often long step of requesting insertion from their development team will certainly be happy to know that it can also be inserted via Google Tag Manager , if it is already activated on the site .
Le script
Here is the jQuery script you will need to insert:
<script>

	$(document).on('click', '.mejs-button.mejs-playpause-button.mejs-play', function () {

		gtag('event', 'click_audio_conte', {'event_category': 'button', 'event_label': 'bouton_audio'});

});

</script>
You will need to replace the italicized elements with, in the order of appearance: 1) your CSS class selector (ex: .mejs-button.mejs-playpause-button.mejs-play ), 2) the name you want give your event (eg: click_audio_conte ), 3) the event category (eg: button – for your own organization), 4) the label of the event (eg: button_audio for your own organization).
Important for WordPress sites : In most cases if you are using WordPress like me, you will need to replace the $ symbol with jQuery
Insert your site into the code
Depending on whether the event concerns a single page or several pages on your site, you will need to choose the best optimized method so as not to burden your site for nothing with a new script.
If you know how to code, for example, it will be enough to paste it in the <head> or in the <body> dynamically (all pages or on a type of page) or “manually” on a single page.
If you are on WordPress , you can use a script insertion plugin , or use the integration option of your theme like here on the Divi theme in Divi > Options > Integration (see above to change the $) :

Insert the code via Google Tag Manager
If you do not have access to the code and have Google Tag Manager installed on your site, or if you wish to reduce your code with an additional script, this method is yours:
- Create a new custom HTML type tag and insert your script into it.
- Define the trigger on all pages or according to your situation

Check that the event is sent and received
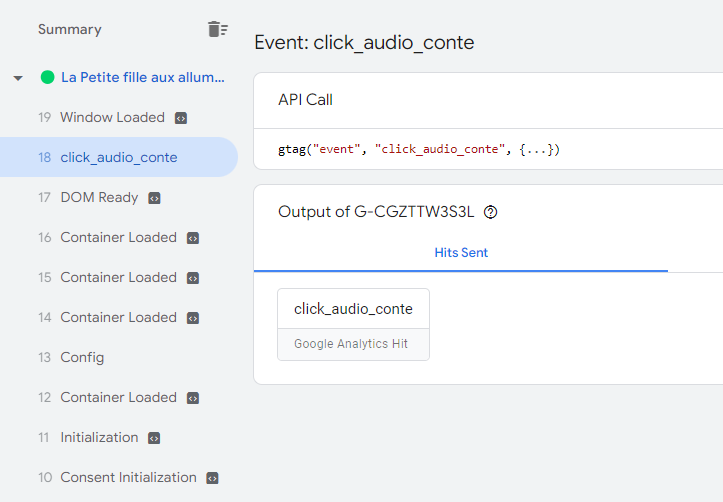
You can verify that the event is triggered by using the Google Tag Manager preview tool when you are connected or via the Google Chrome Tag assistant Companion extension .
Click on the element of your site in the preview window and check the list on the left in the event tracking window if it appears:
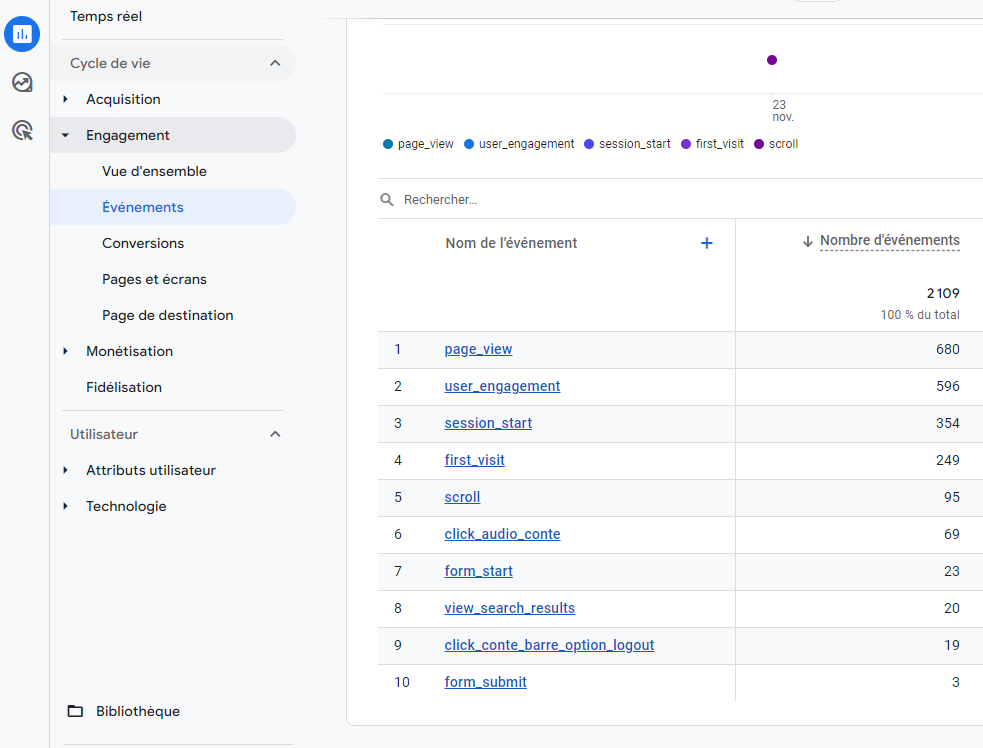
Then check that the event has arrived on Google Analytics 4 by going to the Engagement > Events report :
Please note : You generally have to wait until the next day to see the full results on Analytics. And remember to click on the element on the public version of your site outside of Google’s simulation tools to make sure it submits at least once.
Convert the event into Analytics and Google Ads conversion
Once the event has received at least one click on Analytics , you can turn it into a conversion to appear in the Engagement > Conversions report and then use it as a Google Ads conversion .
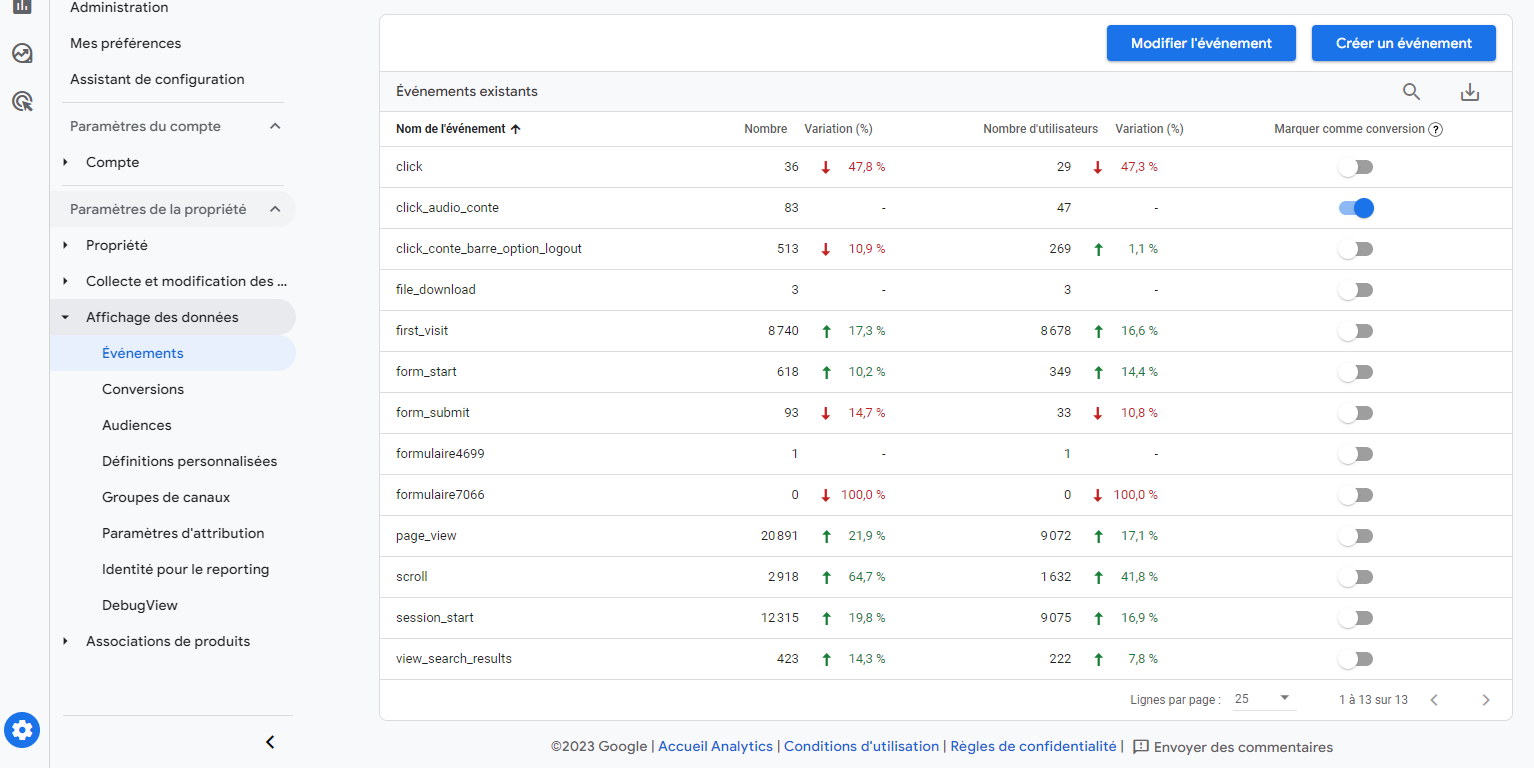
To do this, go to Administration > Events , and click the “ Mark as conversion ” activation button :
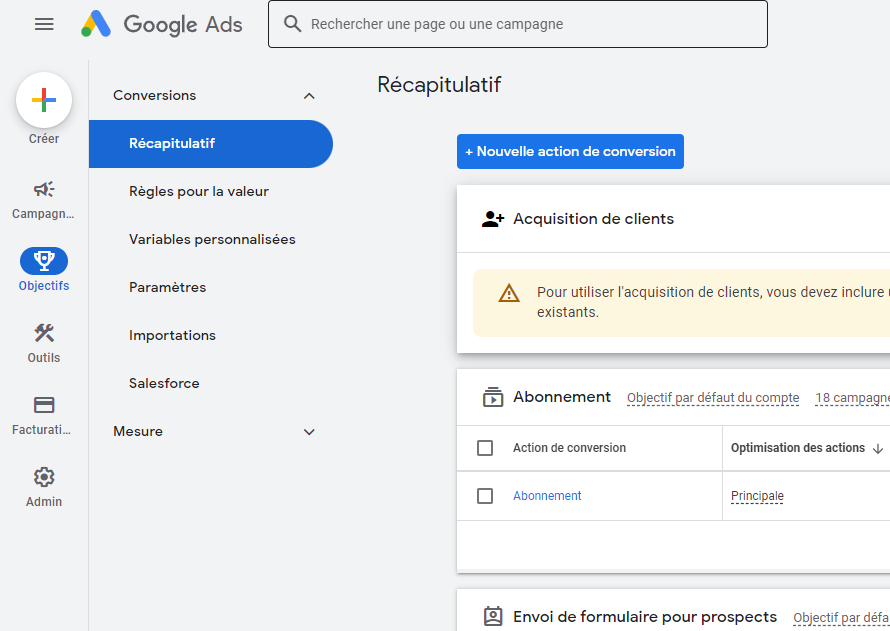
Import the conversion Analytics into Google Ads
Go to Goals > Conversions > Summary and click “+New conversion action”
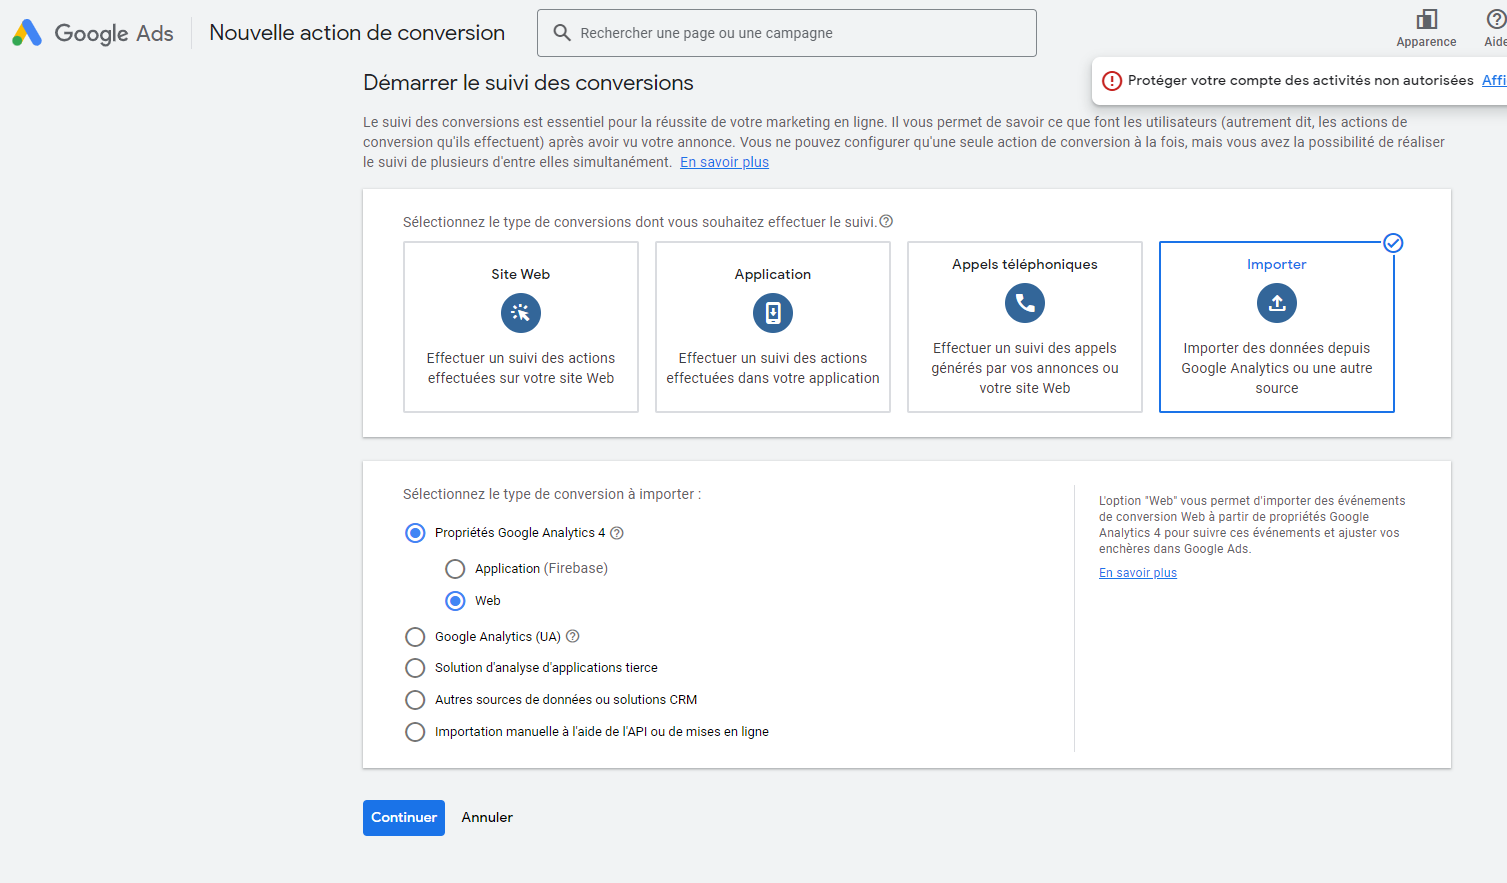
Click “ import ” and choose “ Google Analytics 4 Properties” / Web
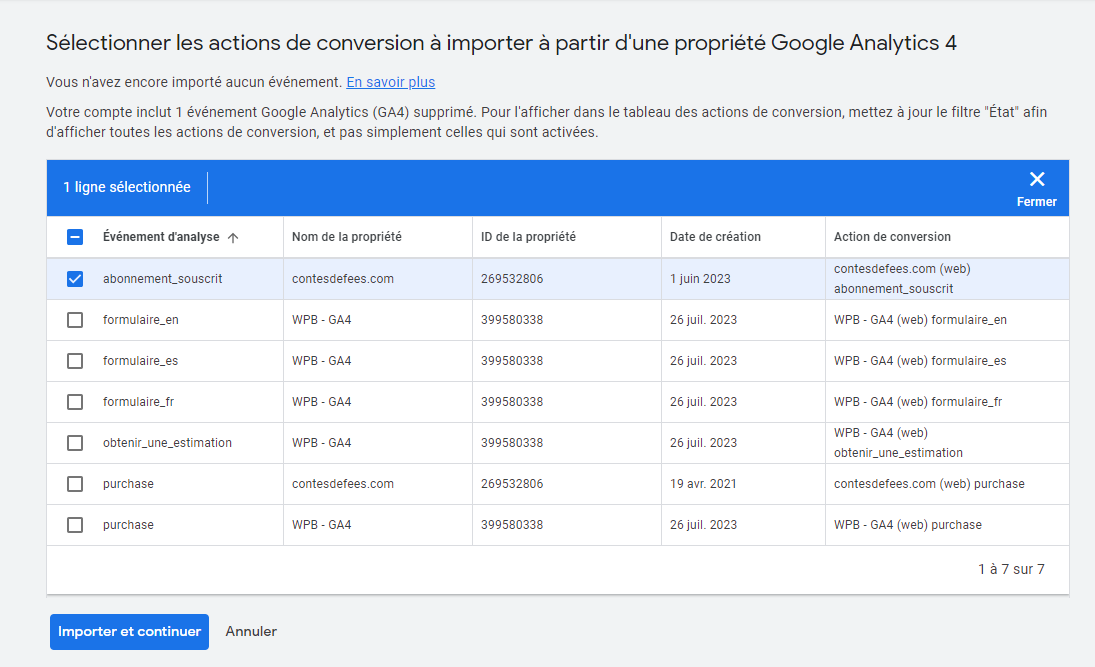
Choose your conversion and import it. And There you go !
(Here my “click_audio_conte” conversion is no longer visible because I deleted it to be able to redo the screenshot and there is probably a bug because contrary to what is indicated on this screenshot, there is no has no bug filter – Be careful not to delete your conversions too quickly!)
We hope you enjoyed this tutorial and that you can measure all the important actions on your site using it: Buttons, forms, videos, promotions, leaflets, etc.
If you need help doing this, don’t hesitate to hire me, I am a freelance WordPress expert developer and integrator of Google Analytics and Tag Manager and also manage Google Ads campaigns , with a background as an SEM Manager. Write to me here .